There are only two file types required to natively play video in any modern browser with HTML5: WebM and MP4. Currently all major browsers support MP4, but WebM allows for a much better quality-to-filesize ratio. Using ffmpeg you can transcode any multimedia file into WebM and MP4 from your command line.
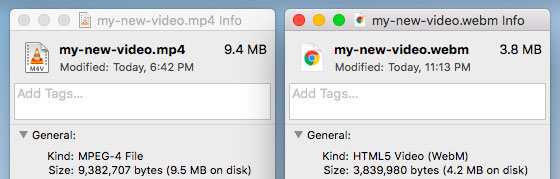
The same file transcoded to H.264-MP4 and VP9-WebM with the same bitrate. The WebM filesize is 40% that of the MP4.
Ffmpeg is a hugely powerful tool. It supports just about every codec going and has a relatively simple interface. With that said, it does require you have at least a basic knowledge of multimedia encoding, so it can be a little daunting if you’re just looking to create the necessary files to use the <video> tag on your site. Here’s a step by step guide to getting the files you need for any browser to natively play your video.
Install ffmpeg
On OSX, use homebrew to build ffmpeg on your machine. Compiling ffmpeg with every available codec takes a long time, so we’ll just build with the three codecs we need:
brew install ffmpeg --with-libvpx --with-libx264 --with-libvorbis
This can still take a fair bit of time (it took 15 minutes on my computer), so go and have a stretch or call your Grandma.
If you’re wondering what the --with flags mean:
- LibVPX is a library that contains implementations of the VP8 and VP9 encoders (hence VPX) that create WebM video files. (We will only be using VP9).
- libvorbis contains an implementation of the Ogg Vorbis encoder that is used for encoding audio tracks in the WebM container.
- libx264 is a codec from VideoLAN (who make VLC) that lets us encode H.264 video and audio into the MP4 container.
Create the WebM file
cd into the directory containing your source/input video file and run the following command, replacing the filenames appropriately:
ffmpeg -i my-original-video.wmv -f webm -vcodec libvpx-vp9 -vb 1024k my-new-video.webm
There’s a bit going on here, so let’s break it down while you wait for your video to transcode.
my-original-video.wmvis the filename of your source file. You can use any type of video file (AVI, WMV, MP4, etc.)webmis the container format we want to use for the output file (do not change this)libvpx-vp9is the video codec library we will be using for the transcoding. VP9 is the specific encoder.1024kis the bitrate that the output video will have. You may want to tweak this value depending on the desired quality of the video. Higher bitrates mean bigger files, which mean longer buffer times.my-new-video.webmis the name of the output file.
By default, the audio track will be transcoded to the output file using the libvorbis encoder. If you want to change the bitrate of the audio you can do so with the -ab flag, e.g. -ab 128k.
If you wish to output a silent video, then you should pass the flag -an to transcode the video without an audio track. This must go immediately before the output file name, e.g. [...] -an my-new-video.webm. This is useful for adhering to iOS Webkit’s requirements for supporting the HTML5 video inline and autoplay attributes.
Create the MP4 file
Now run:
ffmpeg -i my-original-video.wmv -vcodec libx264 -f mp4 -vb 1024k -preset slow my-new-video.mp4
The flags here are similar, except we’re using the libx264 codec to create a video with an MP4 container. The -preset slow flag increases the encoding time but results in a better quality-to-filesize ratio. You should use the slowest preset that you have the patience for.
Again, you can tweak the bitrate flag for video (-vb) and audio (-ab), and pass the -an flag before the output file name if you want to encode the video without an audio channel.
Embed the files with <video>
Now you can reference the files you’ve created within your HTML:
<video>
  <source
    src="my-new-video.webm"
    type="video/webm"
  >
  <source
    src="my-new-video.mp4"
    type="video/mp4"
  >
</video>
And that’s it! ffmpeg supports a huge number of options when encoding, transcoding or streaming multimedia, so be sure to refer to the docs if you need to achieve something that isn’t mentioned here.